안드로이드 스튜디오 간단한 로그인화면 구성하기
2019. 12. 16. 11:12ㆍ2020/Android App Develop
|
1
2
3
4
5
6
7
8
9
10
11
12
13
14
15
16
17
18
19
20
21
22
23
24
25
26
27
28
29
30
31
32
33
34
35
36
37
38
39
40
41
42
43
44
45
46
47
48
49
50
51
52
53
54
55
56
57
58
59
60
61
62
63
64
65
66
67
68
69
70
71
72
73
74
75
76
77
78
79
80
81
82
83
84
85
86
87
88
89
|
<?xml version="1.0" encoding="utf-8"?>
<androidx.constraintlayout.widget.ConstraintLayout xmlns:android="http://schemas.android.com/apk/res/android"
xmlns:app="http://schemas.android.com/apk/res-auto"
xmlns:tools="http://schemas.android.com/tools"
android:layout_width="match_parent"
android:layout_height="match_parent"
tools:context=".MainActivity">
<!-- 기본적인 로그인 화면을 구성하자. 디자인 X -->
<LinearLayout
android:layout_width="match_parent"
android:layout_height="match_parent"
android:orientation="vertical"
>
<ImageView
android:layout_width="match_parent"
android:layout_height="wrap_content"
android:src="@mipmap/ic_launcher">
</ImageView>
<TextView
android:layout_width="match_parent"
android:layout_height="wrap_content"
android:text="Login"
android:textSize="30dp"
android:textColor="@android:color/black"
android:gravity="center"
></TextView>
<TextView
android:layout_width="wrap_content"
android:layout_height="wrap_content"
android:text="Email Address"
></TextView>
<EditText
android:layout_width="match_parent"
android:layout_height="wrap_content"
android:background="@android:color/holo_purple"
android:text="ID를 입력하세요"
/>
<TextView
android:layout_width="wrap_content"
android:layout_height="wrap_content"
android:text="Password"
></TextView>
<EditText
android:layout_width="match_parent"
android:layout_height="wrap_content"
android:background="@android:color/holo_blue_dark"
android:text="PASSWORD를 입력하세요"
/>
<Button
android:layout_width="match_parent"
android:layout_height="wrap_content"
android:text="LOGIN"
android:gravity="center"
/>
<TextView
android:layout_width="wrap_content"
android:layout_height="wrap_content"
android:text="or"
android:textSize="30dp"
android:layout_gravity="center"
></TextView>
<Button
android:layout_width="match_parent"
android:layout_height="wrap_content"
android:text="Sign UP"
android:gravity="center"
/>
<LinearLayout
android:layout_width="match_parent"
android:layout_height="wrap_content"
android:orientation="horizontal"
android:weightSum="2">
<TextView
android:layout_width="wrap_content"
android:layout_height="wrap_content"
android:text="Find ID"
android:layout_weight="1"
android:gravity="center">
</TextView>
<TextView
android:layout_width="wrap_content"
android:layout_height="wrap_content"
android:text="Find password"
android:layout_weight="1"
android:gravity="center">
</TextView>
</LinearLayout>
</LinearLayout>
http://colorscripter.com/info#e" target="_blank" style="color:#4f4f4ftext-decoration:none">Colored by Color Scripter
|
ㄷhttp://colorscripter.com/info#e" target="_blank" style="text-decoration:none;color:white">cs |
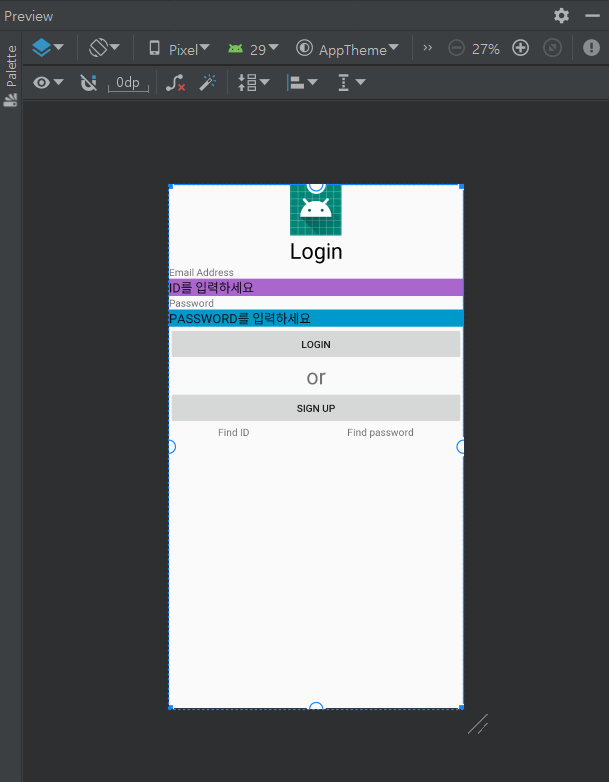
1. ImageView
해당 요소를 통해서 이미지를 보여준다. ( android:src="" 이미지 불러오기 )
2. EditText
사용자가 앱 사용시 데이터를 입력할 수 있는 공간
3. LinearLayout in LinearLayout
Find Id 버튼과 Find Password버튼을 좌우로 정렬 시키기 위해서 또 다른 LinearLayout태그를 사용하였다.
gravity="center"를 통해 중앙정렬을 시킬 수 있지만 weightsum을 활용해 두 요소를 중앙 정렬하였다.
'2020 > Android App Develop' 카테고리의 다른 글
| 안드로이드 스튜디오 뉴스앱 만들기 (RecyclerView) (0) | 2019.12.20 |
|---|---|
| 안드로이드스튜디오 로그인 값 검사하기 ( 입력 이벤트 리스너 addTextChangedListener ) (0) | 2019.12.19 |
| 안드로이드스튜디오 다른 Activity로 값 넘겨주기 (intent, bundle) (0) | 2019.12.19 |
| 안드로이드 스튜디오 로그인 화면 구성하기 ( textInputEditText, Button, ImageView ) (android x implementat (0) | 2019.12.17 |
| 안드로이드 스튜디오 LinearLayout, RelativeLayout, Components (0) | 2019.12.13 |