2019. 12. 17. 17:48ㆍ2020/Android App Develop
<1> Components
LinearLayout, RelativeLayout, TextView, ImageView, textInputEditText, RelativeLayout, Button(TextView+clickable로 대체)
<2> Files
* MyApplication>app>src>main>java>com>example>myapplication>MainActivity.java
* MyApplication>app>src>main>res>layout>activity_login.xml
* MyApplication>app>src>main>res>drawable
- 해당 디렉토리에 이미지파일과 특정 요소들의 백그라운드로 활용할 xml파일들을 저장
* Myapplication>app>src>main>res>values>colors.xml
* build.gradle (Module: app)
- android x 라이브러리 사용을 위한 설정
[ build.gradle source code]
|
1
2
3
4
5
6
7
8
9
10
11
12
13
14
15
16
17
18
19
20
21
22
23
24
25
26
27
28
29
30
31
32
33
34
35
|
apply plugin: 'com.android.application'
android {
compileSdkVersion 29
buildToolsVersion "29.0.2"
defaultConfig {
applicationId "com.example.myapplication"
minSdkVersion 15
targetSdkVersion 29
versionCode 1
versionName "1.0"
testInstrumentationRunner "androidx.test.runner.AndroidJUnitRunner"
}
buildTypes {
release {
minifyEnabled false
proguardFiles getDefaultProguardFile('proguard-android-optimize.txt'), 'proguard-rules.pro'
}
}
}
allprojects{
repositories{
google()
jcenter()
}
}
dependencies {
implementation fileTree(dir: 'libs', include: ['*.jar'])
implementation 'androidx.appcompat:appcompat:1.0.2'
implementation 'androidx.constraintlayout:constraintlayout:1.1.3'
testImplementation 'junit:junit:4.12'
androidTestImplementation 'androidx.test.ext:junit:1.1.0'
androidTestImplementation 'androidx.test.espresso:espresso-core:3.1.1'
}
http://colorscripter.com/info#e" target="_blank" style="color:#4f4f4ftext-decoration:none">Colored by Color Scripter
|
위 소스는 최신버전의 안드로이드 스튜디오를 다운받은 상황에서 두가지 부분의 코드만 추가함 ( 다운일 2019.12.16 )
1. allproject{ ... }
2. api 'com.google.android.material:material:1.1..0-apha06'
이유는 안드로이드에서 제공하는 기본 디자인인 요소태그 textInputEditText를 사용하기 위해서
원래는 디자인 라이브러리를 import하여서 사용하였는데 버전이 올라가면서 androidx로 통합되고있다고 한다(?)
<3> 소스코드
|
1
2
3
4
5
6
7
8
9
10
11
12
13
14
15
16
17
18
19
20
21
22
23
24
25
26
27
28
29
30
31
32
33
34
35
36
37
38
39
40
41
42
43
44
45
46
47
48
49
50
51
52
53
54
55
56
57
58
59
60
61
62
63
64
65
66
67
68
69
70
71
72
73
74
75
76
77
78
79
80
81
82
83
84
85
86
87
88
89
90
91
92
93
94
95
96
97
98
99
100
101
102
103
104
105
106
107
108
109
110
111
112
113
114
115
116
117
118
119
120
121
122
123
124
125
126
127
128
129
130
131
132
133
134
135
136
137
138
139
140
141
142
143
144
145
146
147
148
149
150
151
152
153
154
155
156
157
158
159
160
161
162
163
164
165
166
167
168
169
170
171
172
173
174
175
176
177
178
179
180
181
182
183
184
185
186
187
188
189
190
191
192
193
|
<?xml version="1.0" encoding="utf-8"?>
<androidx.constraintlayout.widget.ConstraintLayout xmlns:android="http://schemas.android.com/apk/res/android"
xmlns:app="http://schemas.android.com/apk/res-auto"
xmlns:tools="http://schemas.android.com/tools"
android:layout_width="match_parent"
android:layout_height="match_parent"
tools:context=".MainActivity">
// 전체 틀
<LinearLayout
android:layout_width="match_parent"
android:layout_height="match_parent"
android:background="#ffffff"
android:orientation="vertical"
android:paddingTop="20dp"
>
<TextView
android:layout_width="match_parent"
android:layout_height="wrap_content"
android:gravity="center"
android:paddingBottom="10dp"
android:text="LOGIN"
android:textColor="@color/Blue"
android:textSize="30dp"></TextView>
//이미지를 가져오고 크기조절(width,height)
<ImageView
android:layout_width="50dp"
android:layout_height="50dp"
android:src="@drawable/icon_happy"
android:layout_gravity="center"
>
</ImageView>
// Email과 password를 입력할 수 있는 editText요소
// material에서 가져온 태그사용 ( 이미 디자인이 되어있어서 크기와 hint만 수정 )
android:layout_width="match_parent"
android:layout_height="wrap_content">
android:layout_width="match_parent"
android:layout_height="match_parent"
android:hint="Email Address">
android:layout_width="match_parent"
android:layout_height="wrap_content">
android:layout_width="match_parent"
android:layout_height="match_parent"
android:hint="Password"></com.google.android.material.textfield.TextInputEditText>
// 원래는 Button을 통해서 Login클릭을 하지만 Login글씨 옆에 사진을 넣기위해서 Button대신 TextView를 활용
// 좌우 구도를 위해 LinearLayout사용
// 디자인을 변경하기위해 drawable에 만들어놓은 xml파일을 background로 사용
// margin은 해당 요소를 배치한 후 다른 요소와의 간격
// 버튼이 아니기에 clickable값을 true로 하여 클릭이 가능하게 함
// 아래 LinearLayout태그는 연습용으로 제작. weightSum과 width를 통해 두번 째 위치하는 이미지태그가 찌그러지지않게함
<LinearLayout
android:layout_width="match_parent"
android:layout_height="wrap_content"
android:layout_marginLeft="10dp"
android:layout_marginTop="10dp"
android:layout_marginRight="10dp"
android:background="@drawable/botton_background_blue"
android:clickable="true"
android:weightSum="1"
>
<TextView
android:layout_width="0dp"
android:layout_height="wrap_content"
android:layout_centerHorizontal="true"
android:background="@null"
android:gravity="center"
android:text="PRACTICE COMPONENT"
android:textColor="#ffffff"
android:textSize="15dp"
android:layout_weight="1"></TextView>
<ImageView
android:layout_width="20dp"
android:layout_height="20dp"
android:layout_marginLeft="10dp"
android:src="@drawable/yellow_star"
></ImageView>
</LinearLayout>
// 실제 로그인 버튼 2개
// 원래는 Button을 통해서 Login클릭을 하지만 Login글씨 옆에 사진을 넣기위해서 Button대신 TextView를 활용
// 디자인을 변경하기위해 drawable에 만들어놓은 xml파일을 background로 사용
// clickable=true -> 해당 요소를 Button으로 활용가능
// 위치선정을 위해서 아이디값을 주고 toLeftOf, toRightOf, centerHorizontal, centerVertial 활용
<RelativeLayout
android:layout_width="match_parent"
android:layout_height="wrap_content"
android:layout_marginLeft="10dp"
android:layout_marginRight="10dp"
android:layout_marginTop="10dp"
android:background="@drawable/botton_background_blue"
android:clickable="true"
android:gravity="center">
<ImageView
android:layout_width="20dp"
android:layout_height="20dp"
android:layout_centerHorizontal="true"
android:layout_margin="10dp"
android:layout_toRightOf="@+id/login_textView_1"
android:src="@drawable/yellow_star"></ImageView>
<TextView
android:id="@+id/login_textView_1"
android:layout_width="wrap_content"
android:layout_height="wrap_content"
android:layout_centerHorizontal="true"
android:layout_centerVertical="true"
android:background="@null"
android:text="LOGIN"
android:textColor="#ffffff"
android:textSize="15dp"></TextView>
</RelativeLayout>
<TextView
android:layout_width="match_parent"
android:layout_height="wrap_content"
android:gravity="center"
android:text="OR"
android:textSize="15dp"></TextView>
<RelativeLayout
android:layout_width="match_parent"
android:layout_height="wrap_content"
android:layout_marginLeft="10dp"
android:layout_marginRight="10dp"
android:layout_marginBottom="10dp"
android:background="@drawable/botton_background_light_purple"
android:clickable="true"
android:gravity="center">
<ImageView
android:layout_width="20dp"
android:layout_height="20dp"
android:layout_centerHorizontal="true"
android:layout_margin="10dp"
android:layout_toLeftOf="@+id/login_textView_2"
android:src="@drawable/yellow_something"></ImageView>
<TextView
android:id="@+id/login_textView_2"
android:layout_width="wrap_content"
android:layout_height="wrap_content"
android:layout_centerHorizontal="true"
android:layout_centerVertical="true"
android:background="@null"
android:text="LOGIN WITH TISTORY"
android:textColor="#ffffff"
android:textSize="15dp"></TextView>
</RelativeLayout>
// 마지막 두개의 버튼
<LinearLayout
android:layout_width="match_parent"
android:layout_height="wrap_content"
android:gravity="center">
<Button
android:layout_width="match_parent"
android:layout_height="wrap_content"
android:layout_weight="5"
android:background="#ffffff"
android:gravity="center"
android:stateListAnimator="@null"
android:text="SIGN UP"
android:textSize="12dp"></Button>
<Button
android:layout_width="match_parent"
android:layout_height="wrap_content"
android:layout_weight="5"
android:background="#ffffff"
android:gravity="center"
android:text="FIND PASSWORD"
android:textSize="12dp"></Button>
</LinearLayout>
</LinearLayout>
http://colorscripter.com/info#e" target="_blank" style="color:#4f4f4ftext-decoration:none">Colored by Color Scripter
|
<4> 실행결과
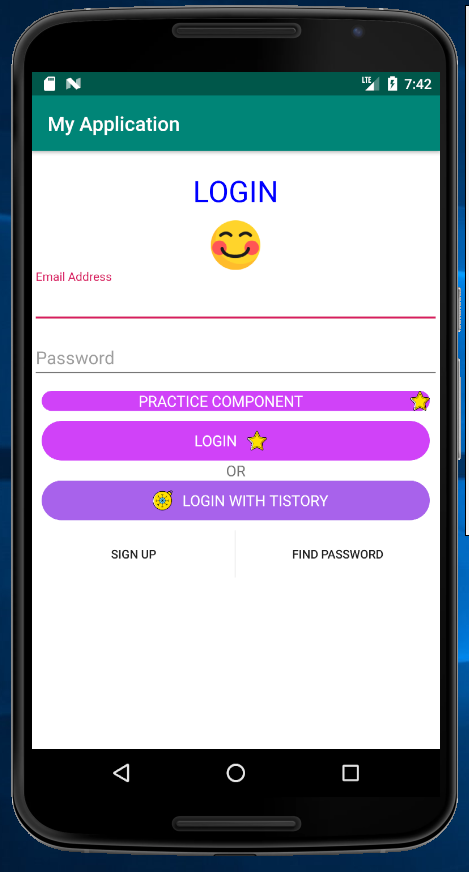
- Login Button 클릭 후
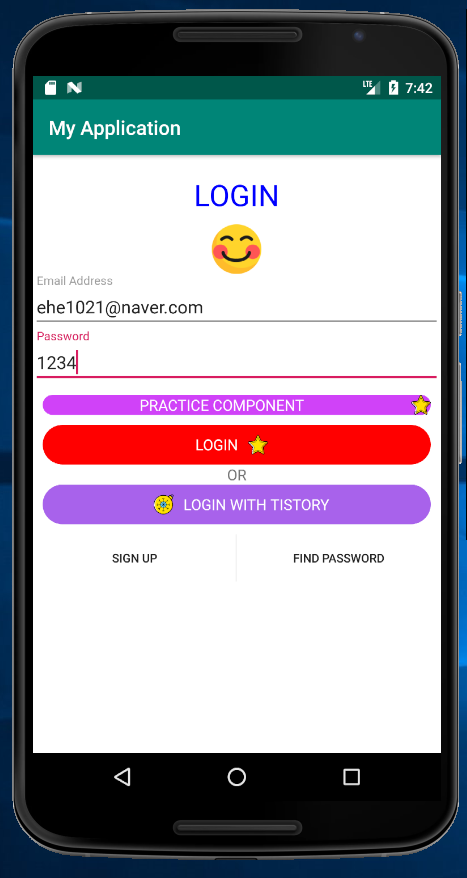
버튼 클릭 시 버튼의 배경색이 변하였다 - 해당 효과는 drawable에 저장한 xml파일을 활용
[ botton_backround_blue.xml ] - Login요소 android:background="@drawable/botton_background_blue"
|
1
2
3
4
5
6
7
8
9
10
11
12
13
14
15
16
17
18
19
20
21
22
23
24
25
26
27
28
29
|
<?xml version="1.0" encoding="utf-8"?>
<item android:state_pressed="true"> // 해당 요소가 클릭 될 때
<shape android:shape="rectangle"> // 모양 - 사강형
<solid android:color="#ff0000"></solid> // 색
<corners android:radius="20dp"></corners> // 모서리 - 둥글게
</shape>
</item>
<item> // 기본값
<shape>
<solid android:color="#d042f8"></solid>
<corners android:radius="20dp"></corners>
</shape>
</item>
<item android:state_enabled="true"> // 해당 요소가 사용가능할 때와 하지 않을 때 true or false
<shape>
<solid android:color="@color/Blue"></solid>
<corners android:radius="20dp"></corners>
</shape>
</item>
</selector>
http://colorscripter.com/info#e" target="_blank" style="color:#4f4f4ftext-decoration:none">Colored by Color Scripter
|
Login with Tistory요소 - android:background="@drawable/botton_background_light_purple"
|
1
2
3
4
5
6
7
8
9
10
11
12
13
14
15
16
17
18
19
20
21
22
23
24
25
26
27
28
29
30
31
|
<?xml version="1.0" encoding="utf-8"?>
<item android:state_pressed="true">
<shape>
<solid android:color="@color/Red"></solid>
<corners android:radius="20dp"></corners>
</shape>
</item>
<item >
<shape>
<solid android:color="#a862eb"></solid>
<corners android:radius="20dp"></corners>
</shape>
</item>
<item android:state_enabled="true">
<shape>
<solid android:color="@color/Blue"></solid>
<corners android:radius="20dp"></corners>
</shape>
</item>
</selector>
http://colorscripter.com/info#e" target="_blank" style="color:#4f4f4ftext-decoration:none">Colored by Color Scripter
|
http://colorscripter.com/info#e" target="_blank" style="text-decoration:none;color:white">cs |
<5> 참고 colors.xml
|
1
2
3
4
5
6
7
8
9
10
11
12
|
<?xml version="1.0" encoding="utf-8"?>
<resources>
<color name="colorPrimary">#008577</color>
<color name="colorPrimaryDark">#00574B</color>
<color name="colorAccent">#D81B60</color>
<color name="Red">#ff0000</color>
<color name="Blue">#0000ff</color>
<color name="Yellow">#ffff00</color>
<color name="Purple">#d042f8</color>
</resources>
http://colorscripter.com/info#e" target="_blank" style="color:#4f4f4ftext-decoration:none">Colored by Color Scripter
|
색 의 이름을 지정하고 그에 해당하는 RGB값을 설정하여 다음에 쉽게 활용할 수 있다
* 색 추출을 위해서 ONLINE PHOTOSHOP 사이트를 이용 freephototool.com
* APP DESIGN 사진들을 얻기 위해 www.iconfinder.com / Material design (simple한 이미지들)
'2020 > Android App Develop' 카테고리의 다른 글
| 안드로이드 스튜디오 뉴스앱 만들기 (RecyclerView) (0) | 2019.12.20 |
|---|---|
| 안드로이드스튜디오 로그인 값 검사하기 ( 입력 이벤트 리스너 addTextChangedListener ) (0) | 2019.12.19 |
| 안드로이드스튜디오 다른 Activity로 값 넘겨주기 (intent, bundle) (0) | 2019.12.19 |
| 안드로이드 스튜디오 간단한 로그인화면 구성하기 (0) | 2019.12.16 |
| 안드로이드 스튜디오 LinearLayout, RelativeLayout, Components (0) | 2019.12.13 |